Look at this cute "Nest" plaque Vee ( A Haven for Vee ) made for me! Isn't it just darling! Do you see the button she put on the "N". So cute! The colors and paper she used are just perfect. Thank you Vee, I love it! I love it so much I framed it!
I made this plate about year ago and I think it looks so cute with Vee's plaque!
All I did was use Archival Ink in Jet Black, a nest stamp and a plain white plate. Load your stamp and press it on the plate, let it dry and you're good to go. You can use any stamp you have. I don't know if all inks will work the same though. I made this last March and as you can see it's just fine!
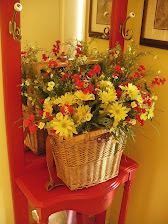
It's about that time to start thinking about some Easter decorating! I thought I'd show you a project that I did last year. It's really easy!
All you do is take a paper mache egg that you can find at any craft store, some white glue or decopauge glue and some glitter. Glue whatever tissue paper, scrapbook paper, wrapping paper or even some cute Easter paper napkins etc onto the egg, sprinkle or roll it in some glitter. Walla, glittered decorated Easter egg. Use whatever paper works for your decor - you know me - I used some toile tissue! Then set them on some thrift store candlesticks or...
place in a nest!
They couldn't be easier to make and it's a fun project that kids will enjoy doing!
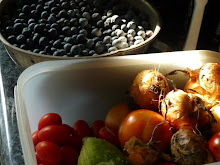
Did you know that seeds sales are up by 30% this year? Yep, lots of people are starting to grow their own food again. With all the food scares in the past few years and the price of fruits and veggies going up, it's really the only way to have some control over your food and food costs. There's nothing as delicious as homegrown vegetables. Freshly picked lettuce for a salad or a warmed by the sun pesticide free tomato, nothing beats that!
Why make a raised bed? Raised beds warm up faster so you can plant earlier and they stay warmer longer so you can extend your season a bit. They also drain better which is great if you've got not so good soil like me. They produce better than traditional vegetable beds. They're also easier to maintain than a traditional bed and the soil doesn't get compacted because you don't walk on it.
You can make a raised bed out of concrete blocks, brick, stone or wood. Mine are made of wood so that what I'm going to show you how to make. It's really easy!
What you need:
Wood planks, a drill, measuring tape, saw, galvanized screws (like deck screws) so they don't rust, Optional - galvanized L brackets or small piece of wood for the corners (corner blocks).
L Bracket or
corner block
What Kind of Wood Should I Use? - I use pine. It holds up for me about 6-7 years. If you are in a very wet climate like the Pacific NW you may want to use cedar. There's a huge controversy about using pressure treated wood. Before it was a strict no no. Now supposedly they are treating the wood with something that isn't suppose to be harmful and leach into your beds like previous pressure treated. Do your research and see what other gardeners are using in your area or stick with pine (the cheapest) or cedar (rot resistant).
What Size Are They? - They can be any size that works for you. If you're going to do Square Foot Gardening (SquareFootGardening.com) he recommends a basic 4 x 4 ft. bed. But you can make them whatever size you want. I just remade some of my beds because they didn't work for me. I'm 5'4" and it was always hard to reach into the center of the bed. So I took some of mine apart and built narrower beds. They were originally 4 feet wide which is average. They are now 2 1/2 wide. You can also make them as tall as you need. You can stack two on top of each other if you're gardening on concrete or really really bad dirt.
Old bed size on the left new on the right
Like with most things, there's more than one way to make a raised vegetable bed. This is my way.
Step One - Cut your planks of wood to what ever size you decided to make your beds.
Step Two -Measure the depth of the wood you're using and then if you're using corner blocks like me, transfer that measurement to your corner block wood and cut 4 corner blocks for each bed.
Step Three - pre-drill your the holes for the screws - believe me it makes it much easier if you take the time to do this step! 3 pilot holes is enough.
Step Four - screw the corners together using the corner blocks on the inside corners until all four pieces are joined.
That's it! So Easy! Here are my new beds in my vegetable garden. I kept two of my old beds on the other side.
I made the paths in between my new beds just big enough for my little garden seat that I got for my birthday. This way I can sit and weed and I don't have to kneel or bend over!
One of my new beds planted with peas, lettuce, and swiss chard (not up yet).
Country Living Magazine
Check out this You Tube video for inspiration. See what you can do with an urban lot!
Most of my regular readers know that I'm pretty crazy about toile (and transferware). My favorite is red toile because....well, red is my favorite color! I also love white so my living room is mainly red and white...
My favorite thrift store makeover!
Discontinued red and gold curtains from JC Penney
My empty china cabinet (you don't see that often)! The back is red and cream toile fabric that I wrapped around cardboard.
Decorated for spring.
My very favorite red toile pillows - they're reversible the back is red gingham.
Black & white toile lamp.
These chairs and the table used to be pine.
I added some red gingham and pom pom fringe to these Waverly curtains.
These are my kitchen curtains. They're a fun combination of black and cream toile, polka dots and kiwi green trim and material (to match my walls).
My kitchen window seat.
My bedroom walls are robin's egg blue and I have black and cream toile bedding and curtains.
Duvet
A brown and blue toile pillow in my bedroom.
As you can see, I really do love toile and have for a long, long, long time! I have a few other toile things but these are the major ones. I hope you enjoyed seeing them!
I'll be back at the end of the week with a tutorial on how to make a raised bed for your veggies.
I love it when people are inspired by a project or a post I've done. That's why I post them! You're always welcome to copy any idea I've shown. I'd love to be able to see what your version looks like. So let me know if you do and I'll come by to have a look!
Please ask permission before copying photos to post on your blog. 99% of the time I say yes. Thanks in advance for that courtesy.


+of+Eleventh+Heaven_Page_610.jpg)