Wednesday, June 9, 2010

My New Fruit Garden


Hi everyone! Hope you are all having a good week so far. I thought I’d show you my new fruit garden today. I don’t know how interesting most of you find the subject of growing your own fruit and veg. But it’s something I’m really passionate about since we like to eat organic and growing our own makes it more affordable. Plus, I’m a big believer in self-sufficiency but that’s another post (or blog) LOL!

This is my new plot in my backyard!


I got the arbor w/gate last year at the end of clearance sale at Big Lots. I just painted it white (ran out of paint so only the front and some of the sides are painted so far)!

I had some extra old picket fencing which I just lashed to the front of the wire fencing. I didn’t want to do anything too permanent. I’ve also planted some sunflower seeds etc in front of the fencing.


As you can see this new area is fairly close to my vegetable garden. I’m not sure I’m keeping it two separate areas. I may combine the two and make one large garden.


In this area we have raspberries!


I haven’t finished the trellis for the raspberry bushes yet. This raised bed is made with concrete cinderblocks as we have a ton of them from dismantling our pond.

A potted lemon tree.


Which has two lemons so far!


My two potted columnar apple trees which I showed you before when they were basically just sticks.


Aunt Molly Ground Cherries!
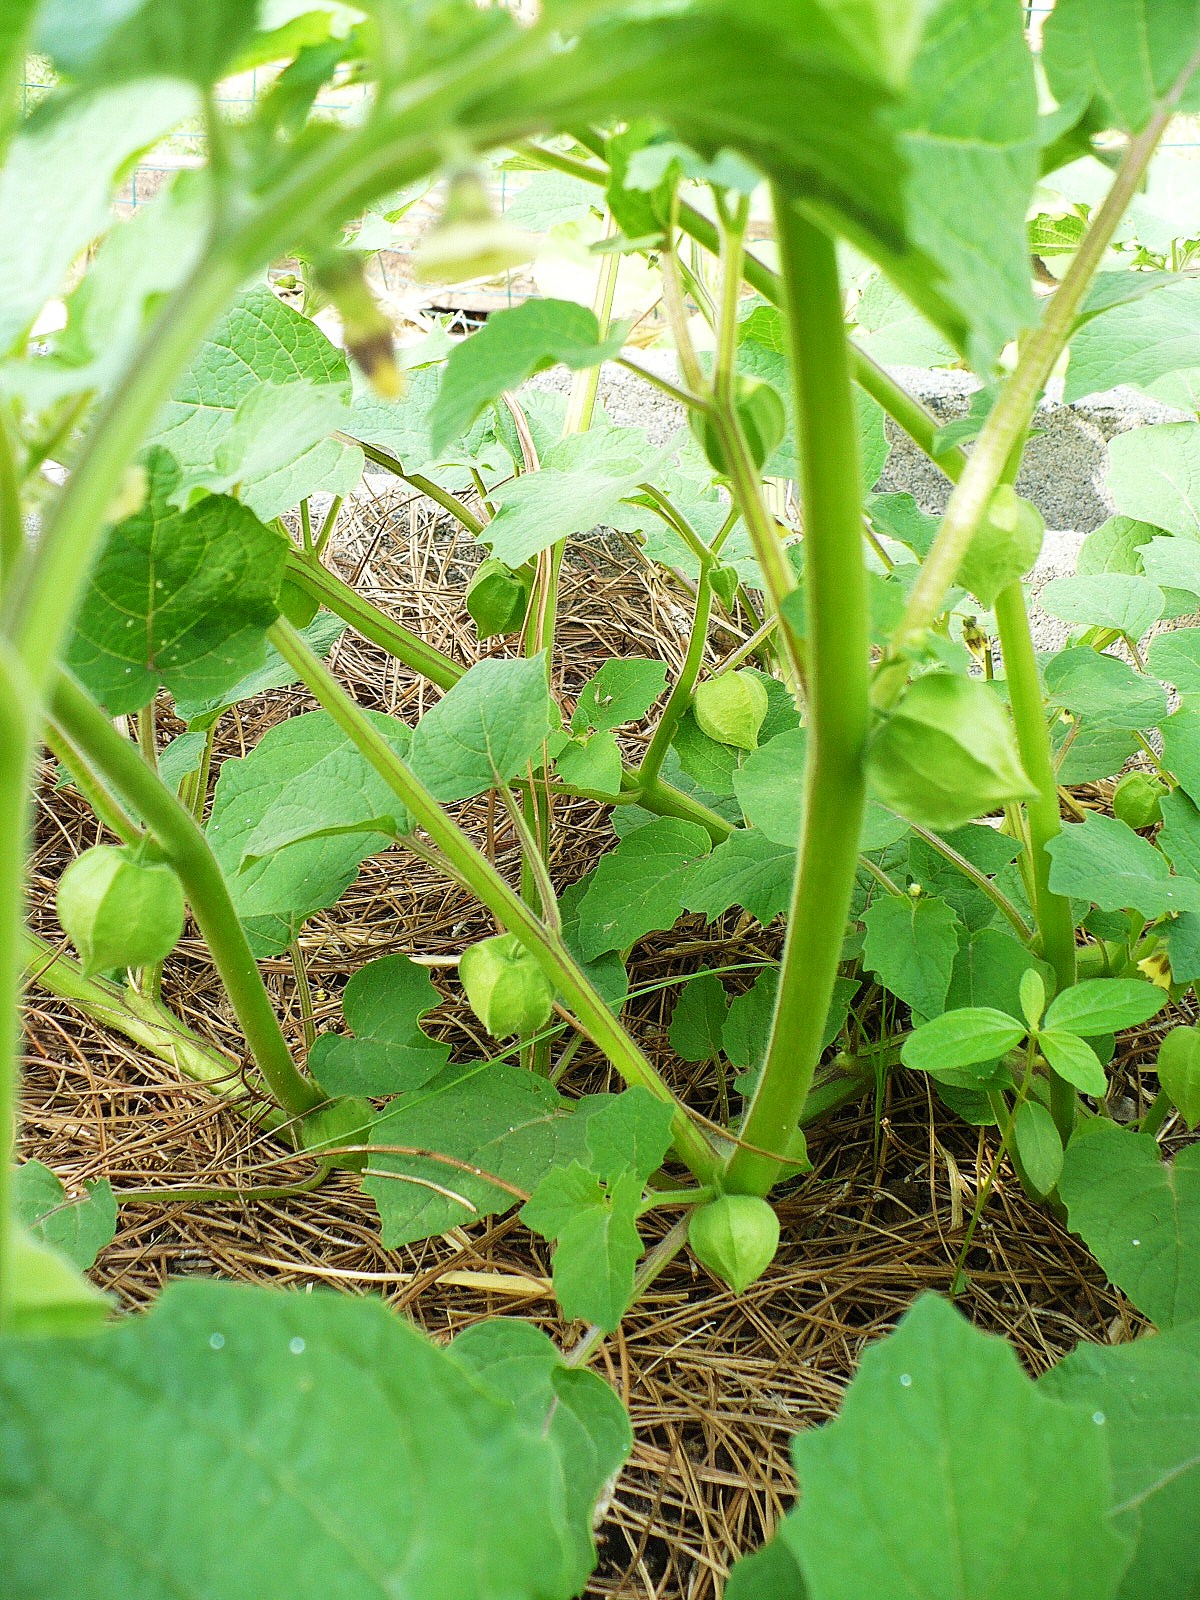

Do you all know about Ground Cherries? The flavor is supposed to be similar to strawberries.

catalog photo not my plant yet


This is my first time growing them and I’m really looking forward to harvesting them. Supposedly they make really good pies and jams.


I have grapes growing along the fence line.


Here’s my one Honeydew melon plant. We’ll see how it does. I don’t really have good luck with melons. I did successfully grow "a" cantaloupe a few years ago, so I have some hope for this melon plant!


There are big and little pumpkin/decorative squash plants growing in here too. Some I’ve tucked into the openings of the cinderblocks but they seem to dry out quickly so I don’t think that was a good idea!!


I’m thinking that if I keep a separate area for fruit, I might net the whole thing like I do my blueberry bushes above.

I’ve see a few photos of people’s dwarf fruit orchard where they erected a netting system over the whole thing instead of individual nets for each tree. I also think I may move my strawberry bed in here and turn my strawberry bed into an asparagus bed!


If you’re interested in urban/suburban farming there’s a really good new magazine out. Check my categories under "In The Garden" on my sidebar for similar posts.


This is published by the people that put out Hobby Farms (another really good mag).


As always, thanks so much for taking the time to stop by today!

As you know, I’m up to my neck with projects around the house due to the termite damage etc and then there’s the garden and just yard and house maintenance. I’m sorry I haven’t been by to see you all (I usually try to, although it’s getting more and more difficult). So bear with me – it’s just an incredibly busy time for me right now (plus I’m trying to teach my daughter how to parallel park etc. so she can get her driver’s license this month)!

Monday, June 7, 2010

Thrifty Finds & Red White & Blue Chicken


Hi everyone! Hope you all had lovely weekends. Ours was busy but fun!I wanted to show you a few recent thriftstore items.
First up is this fabulous little side table!
Magazinetable
I’m thinking of using it as my nightstand. Don’t you think it would be perfect for holding all my nighttime reading material?
back
I think I may remove one of those shelves so I have a place for books but the rest will be great for organizing my magazines! Yellow was 1/2 price that day so I got it for $6.66!
cart
I was so excited when I saw this at Goodwill! Sometimes I need just a bit more surface space in my kitchen and I don’t really have room for an island (although I really wish I did).
knifeblock
I think this will really come in handy. It has wheels so I can roll it out of the way when not in use.
cuttingboard
Look it has a pullout cutting board!
price
I think it will look cute painted black or maybe red. This should be a quick paint project. I can just spray paint it all except the top and cutting board which I’ll leave as is. I had to pay full price for it but I think even at $16 it was a good deal!
chicken
Then there’s this chicken which I got at Goodwill. In theory I guess it could be a cute idea to do a red white and blue chicken. But you’d have to totally go for it and do more than just the tail!
whitechicken
Anyway, I spray painted it a glossy white (I already have a big red chicken) and I thought white would be nice for the summer (but maybe I’ll paint it yellow). Paint really is my BFF!!
redchicken 
Here's a little red chicken on top of a vintage stacking block.
flowers
Well that's it for today. Thanks for spending some time with me! I hope you all have a wonderful week!

Sunday, June 6, 2010

Sunday Photo Feature


The Lilies In My Garden

3colors


photo2
stelladoro
Easterlily
canna
This is a Light My Fire Canna Lily! First time it’s bloomed in  6 years!
photo3
Thanks for stopping by today!
I hope you’re having a lovely Sunday!
Comments are off

Friday, June 4, 2010

The Good, The Bad, and The Ugly

Fleurs
Hi everyone! What a crazy few weeks it’s been! We've been busy doing a lot of projects. I’ll start off with some of the good things and then proceed to what stressed me out.
handrail

After 10 years of living with this metal and wood handrail in my foyer – it is gone gone gone!!

Bannisterbefore

This is my new bannister and I LOVE it. I need to paint it and I’m thinking black handrail/post and white spindles.
Stairs

Of course now the steps are looking shabby so I think I’ll have to paint those again too. But what should I do? I do like the painted runner look but maybe I should just do the steps all one color and the risers a different color? What do you think?
barndoorbefore

Also, finally fixed the barn doors. They look bad don’t they!
doorsfixed
Now the barn is ready to be painted (we pretty much decided on periwinkle with white trim). I think that’ll look particularly pretty in spring with pink roses climbing over top (have to cut them down to paint but they’ll be o.k. by next year).


We fixed a few other little things that we just hadn’t gotten to that were bugging me AND I found two great pieces of furniture at Goodwill (I’ll post them another time)

On to the bad….This is what my family room looked like on  Monday.
FR1

The whole room had paneling when we bought it which I painted a cheery yellow (what else?). You can see a bit of it around the window.
FR
We noticed that something wasn’t right with one of the sections at the beginning of the year (after we had all the flooding rains in the fall) but we just had a new heating/air system installed so we waited to fix it. BIG MISTAKE!

Well, we pulled off that panel  thinking/hoping we just had to put on a replacement panel and found…..TERMITES!!! Yes, we have a Termite Bond (the entire exterior is treated every four years), yes we have yearly inspections etc. Apparently we had more than a few loose bricks/cracked mortar joints on the brickface on the outside of that cinderblock wall which let in a lot of moisture (from those monsoon rains) and termites are really bad in Georgia anyway and they love themselves some wet wood! Coupled with other factors having to do with the way the house was constructed (in the 60’s) which I won’t bore you with, it was just the perfect storm so to speak.

We found them on one end and then starting taking all the panels off that wall and found some on the other end. We kept going until we didn’t find anymore. They were pretty much just in two areas and part of the ceiling.

So  my basement was drilled again on the inside this time and retreated with I’m sure horribly noxious chemicals that probably took a few years off our lives! But what are you going to do. There is no eco-friendly termite treatment as far as I know.
panels 
That’s the ugly above (my apologies to anyone that has this and likes it – I don’t)….with help from friends, we put  up more paneling which I can tell you is such a bummer for me it almost makes me want to cry! I’ve always wanted to drywall the whole basement and this would have been a good time but it’s just out of our budget (we didn’t have a replacement policy on our Termite Bond, just for retreat  so we had to pay for redoing the walls– live and learn).


So, in the future….a post on how to paint paneling….sigh! I have so much stuff to paint and we were in the process of picking colors for my daughter's room because she wanted to repaint her room. That's on the back burner now!

Good thing I have a generally optimistic attitude – it could have been worse and at least I have a home -  even though it sometimes feels like a money pit!
hydrangeas
I had to leave you with something pretty!  Have a great weekend everyone – we had planned on putting in a privacy fence along the back of our property this weekend so we'll go ahead with that since we already have the materials! All I can say is that I'm never bored and who needs a gym membership?


P.S. I changed my template to the stretch so if you are not seeing all of the photos - stretch out the sides of the screen. I have to do that with my desktop but not my laptop.

Wednesday, June 2, 2010

The Winner of the June Book Giveaway is......


 ...... Vicki @ Sand Flat Farm !

Congratulations! Please email me your shipping address and I'll send the book out to you next week.

Thanks to everyone that entered! Remember, this is a monthly event so there's always next month!


Tuesday, June 1, 2010

Cabinet Makeover


Hi everyone! I did a little makeover in my kitchen that I thought I’d share with you all today.
closeup
I replaced the solid wood doors above my microwave with chickenwire and toile fabric.

photo2
Here’s how I did it. I removed the center panel with a jigsaw and then used my Dremel to clean it up.
step1

I cut and attached some chickenwire (used an electric staple gun which makes it so much easier).

step2

Then I  added a piece of La Petite Ferme fabric. Which I didn’t even bother to hem or anything AND I attached it using tacks. Used my pinking shears to cut out the square so the edges wouldn't fray.

Basically I attached it the way I did (with tacks) because this is right above my cooktop and my microwave vents up. So I know that I’ll be wanting to take the fabric off now and then and give it a good rinse.
step3

It also makes it much easier to remove the fabric when I want to change it out for something else. Which I know I’ll do frequently!

Cabinets
toilepictures
Those pictures in the black frames are just scenes I cut out of some toile fabric. I made those 4 or 5 years ago and I keep thinking I should change them out for something else. Yet, every time I go to take them down I ask myself why? I really like them! So there they stay.


I also changed the labels on my spices.
basil

Here’s a link to the Free Printable Cath Kidston Labels I used.  Just copy and paste them into paint and then you can print whatever you want on them. Or just print them out and write on them if you like.
spices

I attached each label to the glass jar by apply clear shipping tape over the label and onto the jar. That way they are easy to wipe clean.
kitchen
Thanks for stopping by today and remember that today is the last day for the June book giveaway. Scroll down a few posts if you haven’t entered yet. I’ll announce the winner tomorrow.