
It was finally a little cooler today so I felt motivated to start doing some fall decorating. Starting with my foyer. I'm not done yet but I thought I'd show you my pumpkin topiary. Here's a very quick way to makeover a craft pumpkin.

I started with this urn (which already was in the foyer with some faux orchids in it) and I painted it black. I didn't have any black spray paint (oh no! how did that happen!) but I did have a quart of black paint from another project and it worked just fine. It sort of looks like a black cast iron urn (love those!).

I have lots of white pumpkins from last year (I don't use the orange ones but you know you can spray paint them - I painted some black last year). I bought those rub ons at Hobby Lobby.

The finished product. I just hot glued the small one to the big one so I won't have any damage (I hope) when I remove them for Christmas. If I can find a another one in a small size I'll add a third pumpkin. If not I'm happy with the way it came out. Those rub ons are super easy and there are so many different motifs to choose from. I think I have some letter rub ons leftover from last year that I'll try on some of the other pumpkins.
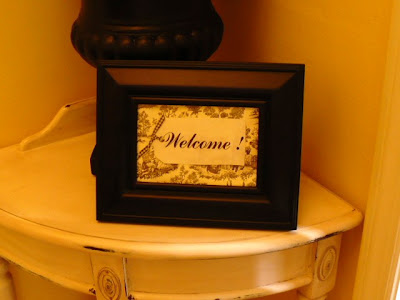
This whole project was under $3 as I had everything except the rub ons. The frame I also had it has said "Nest", "Spring", and "Home". I just print out a new word and glue it on the same tag. The tag is taped onto a piece of toile scrapbook paper - another very easy thing to make and you can constantly change it. I like change!








+of+Eleventh+Heaven_Page_610.jpg)




34 comments:
I love those ideas!
That turned out really nice, Manuela:) You go girl!!
Great Idea. I'll have to try this one out.
Very pretty!
I must search Hobby Lobby for those rub-ons. Great ideas today. Sally
MY! What a autumn statement!!! So classy! Thank you for sharing!
Very elegant pumpkins making that corner look festive and fall ready. Under $3 is icing on the cake!
Cute, cute, cute as usual Manuella!
Very elegant pumpkins, Manuela!
NOW that"s what I'm talking about..... white pumpkins.... Manuela those are OHMYGOSH so cute ... I have NEVER seen them with the rub ons... I LOVE this whole look....as always fantastic....
Big Hugs
Linda
I love love love this project! I even have the pumpkins to use! Now I just need to find an urn and those transfers!
Wow, that is sooo creative ~ I love it!! You always have such great ideas:o)
wow...I had not even thought about using rub-ons...I just thought I might try my hand at free-handing something onto white foamy pumpkins...
hmmmmm...that is a good idea! and I may have to, um, "borrow" it :)
(we're about to have our Hobby Lobby open and I'm so very excited:)
I love your pumpkins! Great idea.
LOVE this project!!! I am so going to copy you!
What a great idea to paint the orange out of the pumpkin. Orange doesn't really go too well in my home either!!
Blessings,
Sher
Hi stranger! I followed a comment by "Manuela" from Pat's blog....and here you are!
So glad to see you...and all of your wonderful ideas! Love this one. The black a white make an elegant statement.
I love love little framed sayings. Yours are adorable. Love the pumpkins too. Mimi
Really like your white stenciled pumpkins, you did a great job on your fall decorating project. karen
So, cute, Manuela! looks like we all have white pumpkins on the brain this year. I don't usually do pumpkins, but I loved that BHG pic so much I decided to try it too. I'm gonna get some of those rub-ons! I was just looking at the whole row of those at HL & I really like the one you got. Those might work great on the yardsale lamsp I just got. Stenciling on curved things sometimes gets messy.
I love your whole arrangement!
RHoda
Came over from Southern Hospitality. WOW those pumpkins turned out beautiful!! What a great job!
M.L.
Very nice! Great project! Deb
Manuela.....LOVE the pumpkins....question....did you take off the stem on the bottom pumpkin? Also, I have been thinking about your former blog and pictures you posted about your kitchen. Didn't you do a tin tile backsplash? I have been thinking of doing one and also using the faux tin tiles for my kitchen ceiling...any advice?
Andrea,
I put the large pumpkin in the urn upside down. So the stem is in the urn and the smaller pumpkin is sitting on a flat surface. I didn't want to cut the stem because I want to be able to do something else with it next year.
Manuela
Dear Manuela,
I am enjoying your lovely blog so much. I love what you did with the pumpkins! Your vignette looks so beautiful!!! Thank you for sharing.
Blessings,
Paula
What a warm and pleasant entry decor!
Hi Manuela! I just stopped by here on the recommendation of Rhoda from Southern Hospitality...she said you did some fun things with the pumpkins and rub-ons, and she was right! Thanks for showing us novices how to do things like this!
Carrie
Great idea to use the rub ons for the pumpkins! All I could think of besides painting one was using a sharpie, what a mess I would've made!
Great fall makeover!
xo
What fun ideas. I like the framed tag. That's a good idea :)
What awesome ideas! I love the black and white theme and that frame is so creative :)
Hugs,
Dena
Love your beautiful work. I'm linking my blog to your post this week. I'm doing some fun fall fest as well.
Found your thread through Southern Hospitality and had to let you know I'm enjoying it! I love this idea. I'm off to figure out if there's a Hobby Lobby in my neck of the woods.
What a great idea for those pumpkins, never thought of the rub ons. I might just try it. Thanks for the inspiration. mishelle
Consider yourself copied. I am soooo doing this! :)
I'm so glad I found you through Rhoda! I used to follow your other blog and had missed you.
Post a Comment